Smearin
Motion smear is the stylized stretch-and-trail effect seen in anime and cartoon animation: a fast-moving character's body smears in the direction of travel for a frame or two, giving the impression of speed. In this project, I implemented it as a plugin for Maya, a 3D animation tool widely used in the film and game industry. In Maya, computation is driven by a dependency graph, which is a network of nodes connected by their attributes that artists wire together to build procedural effects. Building a smear plugin means implementing new node types that drop directly into that graph, so artists can add them to any existing rig the same way they'd use any other Maya tool.
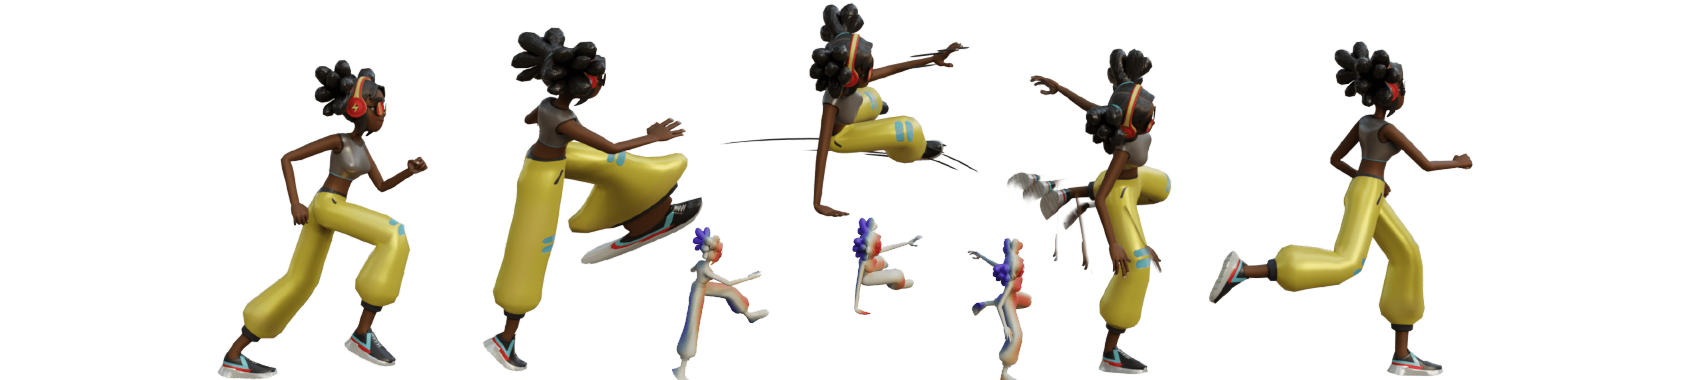
Fig. 1 from Basset, Bénard & Barla, “SMEAR: Stylized Motion Exaggeration with ARt-direction,” SIGGRAPH 2024. Left to right: normal pose, elongated in-between, motion lines, multiple in-betweens, normal pose.
The plugin produces three smear effects: elongated in-betweens (the body stretched along the direction of travel), motion lines (procedural geometry trailing from fast-moving limbs), and multiple in-betweens (ghosted copies of adjacent frames). It works on both rigid props and skeleton-driven character rigs.
To implement the smear effects, the plugin registers three custom nodes into Maya's scene graph:
- SmearDeformerNode: sits in the mesh pipeline and modifies vertex positions on every frame update to produce the elongation effect
- MotionLinesNode: generates the motion lines geometry as a separate renderable mesh
- SmearControlNode: holds the parameters animators adjust: elongation strengths, smooth window, and visualization settings
Keeping those parameters in a dedicated control node means both the deformer and the motion lines node pull from one place. One panel, no duplicated attributes.
To smear a mesh convincingly, the deformer needs to know which vertices are leading the motion and which are trailing. Each vertex is projected onto the axis of travel by computing its signed distance from a plane whose normal is the mesh's velocity vector at the current frame. The result is normalized to [−1, 1]: a value of −1 marks the trailing edge; +1 marks the leading edge.
Two independent multipliers, Past Strength and Future Strength, let artists control trailing stretch separately from leading reach. A fast punch can carry a long trail with almost no forward reach, which is how it tends to read in hand-drawn animation.
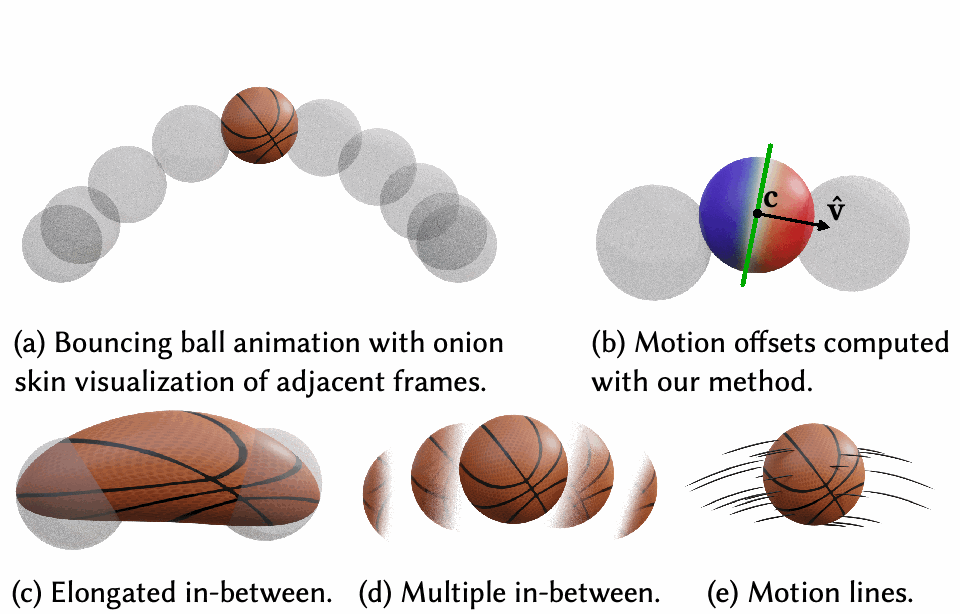
Fig. 3 from Basset, Bénard & Barla, “SMEAR: Stylized Motion Exaggeration with ARt-direction,” SIGGRAPH 2024. (a) input animation; (b) motion offsets — red = leading (+1), blue = trailing (−1); (c–e) the three output effects: elongated in-between, multiple in-between, motion lines.
For objects that move as a single rigid unit, the plugin reads the keyframe data (position curves) directly from the scene graph, bakes per-vertex motion offsets on the first deform call, and caches the result. Subsequent frames are a single O(vertices) lookup with no re-bake. One bug I debugged: when the cache was baked at a different frame rate than the scene's internal 24 fps, scrubbing the timeline would sample the wrong positions, causing the smear to stutter or skip. The fix is a one-line remap before sampling: sampleFrame = frameD × cacheFPS / 24.0.
Each vertex in a character rig gets its final position by blending contributions from nearby skeleton joints. Running that math inside a C++ deformer callback every frame is expensive and tightly coupled to Maya internals. A Python script pre-bakes every vertex position for every frame to a JSON file offline. A custom Maya command loads it into memory at scene open; the deformer reads from the in-memory table at runtime — O(1) per vertex, no skeleton evaluation.
Motion lines are one of the three smear effects the plugin produces. The node generates actual polygon geometry: one thin cylinder per sampled vertex, spanning past position to future position along the smear path. Because the output is a real mesh rather than a screen-space overlay, Maya renders it at full quality in both the viewport and the final output, and it responds to lighting and materials like any other scene object.
The cylinder endpoints come from the same interpolated trajectory the deformer uses for mesh elongation, so the motion lines naturally align with the actual deformation. Artists also get real-time feedback: since the geometry updates every frame as the animator scrubs, there's no need to wait for a render to judge placement and density.
This plugin adapts the motion offset and smear frame approach introduced in:
Jean Basset, Pierre Bénard, and Pascal Barla. “SMEAR: Stylized Motion Exaggeration with ARt-direction.” SIGGRAPH Conference Papers '24, July 27–August 1, 2024, Denver, CO, USA. ACM. https://doi.org/10.1145/3641519.3657457